
Introduction
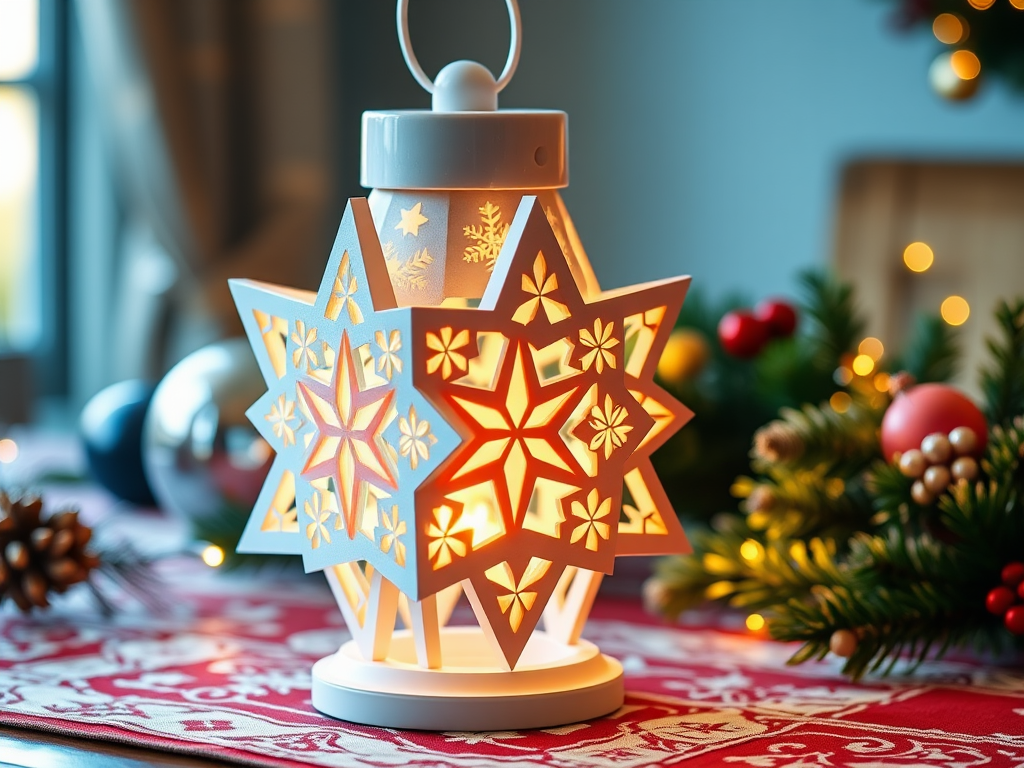
Christmas is a time of happiness, warmth, and enchanted decorations. Creating your own 3d-printed Christmas star lantern is one of the most touching ways to brighten your holiday mood. Whether you are an experienced maker or just beginning your 3D printing adventure, this guide will walk you through the whole process from selecting the appropriate materials to printing, building, and personalising a beautiful star lantern that enhances your holiday décor with a personal, shining touch. Making your own lantern is not only enjoyable but also a meaningful, affordable, and eco-friendly way to honour the time of year. Fire up your printer, get some filament, and let’s add some glimmer to your house!
Why make a Christmas star lantern with 3D printing?
3D printing has offered almost limitless opportunities for producing unusual holiday products as DIY decorations, and maker culture is gaining increasing appeal. Here is the rationale behind why making your own Christmas star lantern is such a great concept:
- Bring your concept to life with unusual forms, colours, and textures.
- Affordable: Save money over purchasing store decor or designer lanterns.
- Personalisation: Include names, engravings, or family-relevant emblems.
- Reduce your environmental effect by using recycled or biodegradable filaments such as PLA.
- Enjoyable for All Ages: A wonderful activity for Christmas crafting evenings, families, or children.
Tools & Supplies Required
Before you start, check that you have the appropriate tools and materials:
- For finer details, 3D printer: resin-based or FDM (most popular).
- Filament: For indoor use, PLA is safe and easy to use; PETG offers additional durability.
- Design File: STL files from sites including Thingiverse, Cults3d, or Printables.
- LEDS: Safe lighting source: USB-powered or battery-operated LEDS.
- Finishing Supplies: Optional glitter or stickers, glue, clear varnish, sandpaper, acrylic paints.
Selecting the Appropriate 3D Model
Online, one can find innumerable lantern designs. While others are simple and more for novices, some have complex cuts for lovely light dispersion.
- Thingiverse – Free, community-made models.
- Cults3d – Free and premium designer-quality files.
- Perfect for creating your own unique design with drag-and-drop tools, Tinkercad.
- Prusa’s well-liked site for selected designs, Printables.com.
Choose a model that fits your printer’s capacity. Avoid ultra-detailed or multi-part designs if you are new to 3D printing.
Progressively: 3D Printing Your Christmas Star Lantern
Create your design file.
- Get the STL file from a reliable website.
- Slicer programs such as PrusaSlicer or Cura should be used.
Suggested configurations:
- Layer Height: 0.1–0.2mm for details.
- Durability without bulk calls for 20–30% filling.
- Assists: Turn on if your design features bridges or overhangs.
Printer Configuration & Material Settings
- PLA: 60°C bed temp, 190–220°C nozzle.
- PETG: 220–250°C nozzle, 70–80°C bed temperature.
- For crisp printing, 50 mm/s is perfect.
- For optimal adherence, level your bed correctly.
- If warping is a problem, consider using a raft or brim.
Track & Fix Problems
- Observe the first several layers to guarantee correct adherence.
- Look for weak edges, layer separation, or stringing.
- Change the temperature and retraction settings as required.
Tips for Assembly & Post-Processing
When your print is finished, it’s time to bring the magic to life:
- Sanding: For a polished appearance, smooth down sharp edges.
- Painting: Festive acrylics—metallics, reds, greens, and golds gleam gloriously.
- Varnishing: Use a clear coat to protect and shine.
- Assembly: Use glue or clips to insert and fasten the LED lights.
- Put it on a mantle, windowsill, or hang it with clear fishing line.
Suggestions for Personalisation
Use these imaginative accents to give your lantern a distinctive touch.
- For a stunning impact, use Glow-in-the-Dark or Metallic Filament.
- Engraved names or dates to turn it into a keepsake.
- Colour contrast by two-colour printing or multi-part assembly.
- Holly shapes, stars, or snowflake cuts.
- For a whimsical touch, include ribbons, bells, or tinsel.
Advanced Advice & Hacks
- Use translucent filament for a gentle glowing effect when lighted from inside.
- Include a Reflective Interior: Stronger light dispersion can be achieved by using mirror film or foil inside the lantern.
- For various moods, use remote-controllable colour-changing LED lamps.
- Modular Architecture: Design the top to be removable, so you can alter the lighting configuration or replace colours.
READ MORE – 3d Print Your Own Toy Story Woody Figure: A Complete Guide
FAQs:
- Do I need a 3D printer to build a star lantern?
Absolutely! Local makerspaces, Craftcloud, or Shapeways are examples of services that can print and deliver your design. - The finest filament for Christmas ornaments is… Which filament is ideal for Christmas ornaments?
The most environmentally safe and user-friendly choice is PLA. For strength and outdoor durability, PETG is superior. - How long does the printing take?
Depending on size, complexity, and printer speed, it can take anywhere from four to twelve hours. - May I use it outside?
Certainly, if printed with PETG and sprayed with a UV-resistant clear spray. Make sure the LEDS are weatherproof. - How can I make the lantern’s glow brighter?
Increase the quantity of LEDS within or use transparent filament and reflective linings.
Conclusion:
3D printing a Christmas star lantern is a creative journey that adds light and character to your holiday festivities, more than simply a craft project. A few tools and a dash of creativity can help you to create a stunning lamp, especially yours. Whether you’re decorating your own house or giving a loved one a handcrafted treasure, this DIY project highlights the essence of the season: creativity, care, and festive joy.
Print your star, turn it on, and let your festive spirit radiate out!
